|
Turbo-Seal Injection Waterproofing System
Drill down to the existing damaged membrane waterproofing layer. Inject Turbo-Seal with its excellent viscosity, expandability, and flexibility into the front or rear of the membrane to repair damage and restore waterproofing.
- Rooftop Repair Process
 
- Drilling
- Drill 18mm diameter holes at 1-meter intervals.
- Installing the injection packer
- For most applications, an injection pipe with an outer diameter of 18mm and a packer are used to make an injection opening and inspection holes at 1-meter intervals.
- Injecting Turbo-Seal
- Inject Turbo-Seal until it overflows at the inspection holes.
- When Turbo-Seal overflows, close the cap of the injection opening. Insert Turbo-Seal into the inspection holes and continue injection using the same method.
- Injection completed
- After finishing the injection, close the injection opening with the nonwoven polymer mortar.
- Underground Repair Process
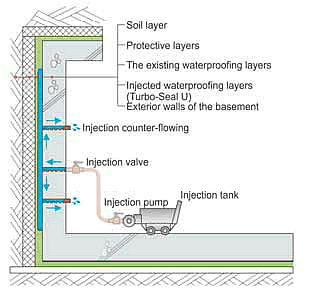 
- Drilling
- Drill 18mm diameter holes at 1-meter intervals from the bottom to the top.
Installing the injection packer
- For most applications, an injection pipe with an outer diameter of 18mm and a packer are used to make an injection opening and inspection holes at 1-meter intervals.
- Injecting Turbo-Seal
- Injecting Turbo-Seal
- Continue injecting Turbo-Seal until it overflows from the top loophole.
- Injection completed
- After finishing the injection, close the injection opening with the nonwoven polymer mortar.
Poly-AS Waterproofing System
Turbo-Seal P + Turbo sheet
This waterproofing method combines Turbo-Seal P, an adhesive and self-sealing waterproofing gel, with the special Turbo sheet to form a multilayer, compound waterproofing system. This dynamic material repairs ruptures and cracks on existing waterproofing layers and solves the damage with its self-sealing capability. If existing sheet layers are damaged, Turbo-Seal P expands on contact with water and fills in the damaged part of the sheet, effectively stopping water leakage and seepage between the sheet and concrete base surface.
- Waterproofing Process For Concealed Roof System
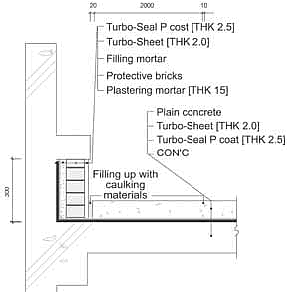 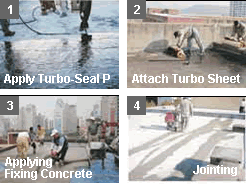
- Underground Waterproofing Process For New Projects

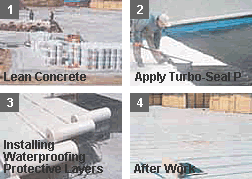
- Combined Wall Section


Exposed Poly-AS Combined Waterproofing System
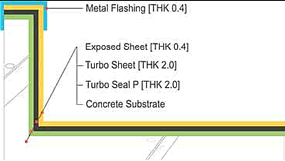
3-ply exposed system - Turbo-Seal P + Turbo Sheet + Exposed Sheet
This 3-ply exposed waterproofing system combines the self-adhesive Turbo-Seal P, Turbo Sheet and specially heat-treated colored Exposed Sheets.
- Exposed POLY-AS Combined Waterproofing Process
 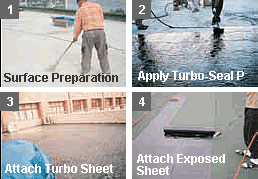
- Surface preparation
- Level off projections (2mm or more).
- Apply Turbo-Seal P
- Using a trowel or a push stick, apply a 2.0mm (¡À0.5mm) coating evenly.
- Reinforce corners, concrete joints, expansion joints and pipe circumference with a 25cm-wide Turbo sheet.
- Attachment of the Turbo sheet
- Apply the Turbo sheet to areas with ambient temperature of 5¡ãC or higher.
- Carefully remove air from inside the sheet.
- Attachment of the exposed sheet
- Attach the exposed sheet, taking care not to allow the sheets to overlap with the connection part Turbo sheets below.
- Locate the edge of the sheets at least 30cm from the jointed part of Turbo sheets.
Expansion Joint Waterproofing System
All materials including concrete and waterproofing material have their own coefficient of thermal expansion, contracting and expanding on the central axis according to temperature change. Since the concrete joint that contributes the most water leakage is located at the farthest point from the central axis, it has the largest movement range. Turbo-Seal flexibly responds to these contractions and expansions to stop water leakage.
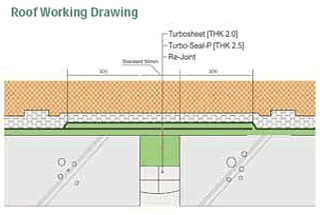 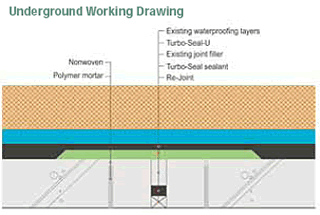
- Expansion Joint Waterproofing Process
- New Re-Joint Construction
- Install the rubberized Re-Joint using adhesives.
- Inject the Turbo-Seal sealant to form a primary waterproofing layer.
- Apply Turbo-Seal to form secondary waterproofing layers.
- Install the Turbo sheet to form an auxiliary protective waterproofing layer.
- For Repairs
- Remove the existing filler as necessary to form waterproofing layers.
- Inject the Turbo-Seal sealant to form a primary waterproofing layer.
- Install the rubberized Re-Joint using adhesives.
- Drill holes down to the rear of the waterproofing layer at 1-meter intervals.
- Inject Turbo-Seal through the injection opening until it overflows at the drilled hole.
- Inject Turbo-Seal into the wall starting from the bottom.
- Finish the drilled holes using a polymer mortar.
|